What is wrong with my camera?
Why am I attempting to answer this question... because I get asked all the time! My astrophotographer friends know that for years I was a CCD camera design engineer for Photometrics in Tucson. In fact, this page is the result of a suggestion made by one of these friends. On these pages you will find a collection of images of real camera issues. My employment has allowed me to see the worst in CCD problems, usually not in production cameras, but cameras in engineering where we often inadvertently (or deliberately) create these issues during the design process. Often the images shown here are extreme cases, but this can be useful in recognizing the same issue when it occurs at a smaller magnitude.
Beyond a camera that just doesn't work and can't take an image most issues show up in the image. Thus more often than not the problem can be diagnosed by looking at an image. When troubleshooting this way it is not an image of stars that is useful, but bias frames, flat fields and darks that really show what the problem is. Camera troubleshooting is more easily performed on the kitchen table, not at the telescope in the dark of some remote observing site.
Below are examples of nearly ideal bias, dark and flat frames from correctly operating cameras. To the right are links leading to a number of pages addressing specific problems.
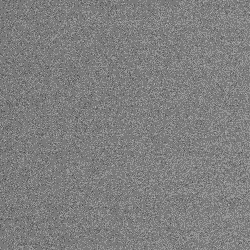
Bias Frame
The bias is a frame taken with a zero length exposure and no light on the CCD. The pixels in a bias should have an average value somewhere above zero (100 to 1000 depending on camera model). Each pixel will be a little higher or lower than this average value by a some random value, this is the electronic noise of the camera, ideally a small value. It is important that no pixel in the bias image have a value of zero. Zeros represent a value that was outside of the lower range of the A/D converter and there is no statistical information in the pixel, any zero value pixel will not be properly corrected when applying bias and dark frame corrections to the image.
The bias will show a number of electronic problems in the camera, excessive noise, pattern noise, gradients and similar issues. To the right is a typical bias frame with a good appearance. Click on the image to download a 16bit tif you can view in your CCD image processing software such as MaxIm.
To take a bias simply set the exposure to zero, do not open the shutter (set for dark or bias in MaxIm) and take an exposure. Some camera shutters (particularly most SBIG cameras) are not very light tight, so cap the camera as well or do this in a darkened room.

Dark Frame
A dark is a frame of the same exposure length as a light frame, usually several minutes, but without any light on the CCD. Dark frames are in effect a map of pixels that have some source of signal in them other than light. Normally light falls on the CCD and interacts with the silicon to free up electrons. These electrons are then moved out of the CCD and counted by the A/D converter. Besides light there are several ways electrons can "leak" into the pixel without light. The dominant source of these electrons is dark current, but issues like spurious charge and residual charge can also give the pixel extra electrons.
A dark frame can show a number of problems with a camera, but it is also very useful in diagnosing other issues when deliberately taken for troubleshooting purposes. Pixels with very high leakage are referred to as "hot pixels" and are normally a problem, but hot pixels are also a nearly ideal signal injected into the image. A CCD designer often learns to love hot pixels as a useful tool. The bright pixels in the example image at the right are hot pixels.
To take a dark frame wait for the camera to cool to the operating temperature, set the exposure to one to five minutes, do not open the shutter (set for dark in MaxIm) and take an exposure. Some camera shutters (particularly most SBIG cameras) are not very light tight, so cap the camera as well or do this in a darkened room. To the right is an ideal dark frame. Click on the image to download a 16bit tif you can view in your CCD image processing software such as MaxIm.

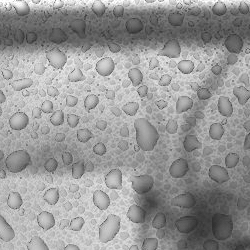
Flat Frame
A flat is an image taken with an even diffused light source, using an exposure that achieves some mid-level value. Flats will show camera electronic problems, shutter problems, as well as CCD defects. A diffused light source is used in troubleshooting, not the collimated light source from a telescope such as the flats that are used in imaging. Because a diffused light source is used dust on the window will not show up well, but dust on the CCD or CCD defects will show up well.
To take a flat field place the camera face up with the window exposed and uncapped. Place scraps of white paper without any printing (look in the trash by your printer) over the window to diffuse the light. Take a short exposure trying to achieve an average value in the frame of about half the maximum (saturation) value. If necessary place more layers of paper over the window of the camera to dim the light to allow longer exposures, or dim the room lights. Exposure lengths of one half to a couple seconds are ideal with average values in the frame of 1k to 3k for a 12bit camera or 10k to 40k for a 16bit camera. To the right is an ideal flat frame. Click on the image to download a 16bit tif you can view in your CCD image processing software such as MaxIm.